Citation :
As I don't have a PS3 ATM but controllers I wanted to get some use out of them. I ran across this:
http://forums.ps2dev.org/viewtopic.php?t=7099
However the instructions aren't flat out listed, and it took me a while to get it working.
What you will need:
SIXAXIS or Dualshock 3
Bluetooth 2.0 dongle or a Bluetooth 2.0 card (Some computers come with them)
USB to B-mini (The cable you use to charge your controller should be fine)
FreeBT (I'll show you where)
BtSix 1.4 (I'll show you where)
PPJoy 0.83 (I'll show you where)
[color=#dd0000]MAKE SURE YOUR PS3 IS OFF BEFORE DOING ANYTHING WITH THE CONTROLLER!!![/color]
You'll need to install libusb-win32-filter-bin-0.1.12.1.exe, get that [url=http://sourceforge.net/project/showfiles.php?group_id=78138]here
[/url]
FreeBT
Next with the Bluetooth dongle. Download the latest version of FreeBT here. FreeBT is an Open source Bluetooth Driver that will Allow BtSix to access the controller. If you just bought the device, when you plug it in it should start to search for drivers.
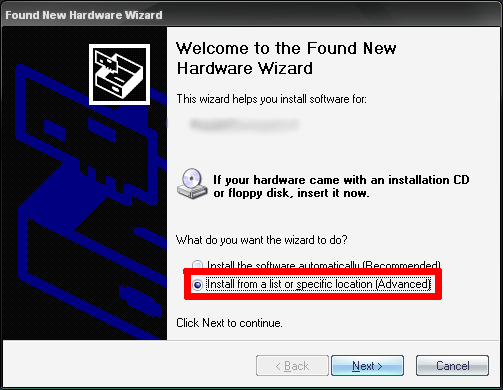
Do it manually, it should have an option to search your computer for the appropriate driver.
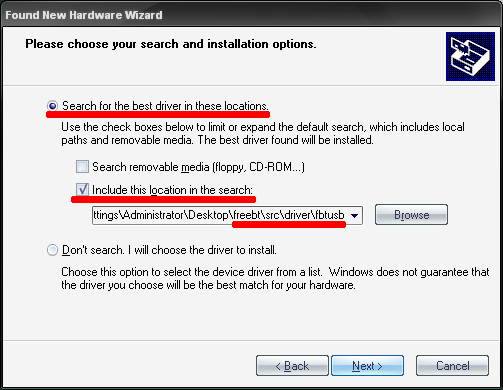
There should also be a box Below it that will search specific folders Make the folder (XXXX\src\driver\fbtusb, where XXXX is where you extracted the folder).
BtSix 1.4
Time to get BtSix 1.4 [url=http://bqron.free.fr/PS3/BT/BtSix.1.4.zip]here
[/url]. We won't do anything with it for now, just extract to a safe place.
PPJoy
Now get PPjoy here. PPJoy is Free Software used to configure Joysticks for various ports.
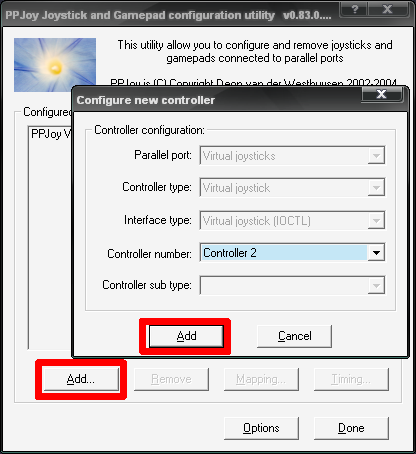
Open up PPjoy and press "Add..." what ever the Dialog says just click Add.

The found new hardware wizard should pop-up, and press "Install from a list or a specific location". Remember where you extracted BtSix? Direct it to the Folder called "Driver XP" using the search function.
Putting it all together
Finally we get to plug the Controller in using a USB Cable.
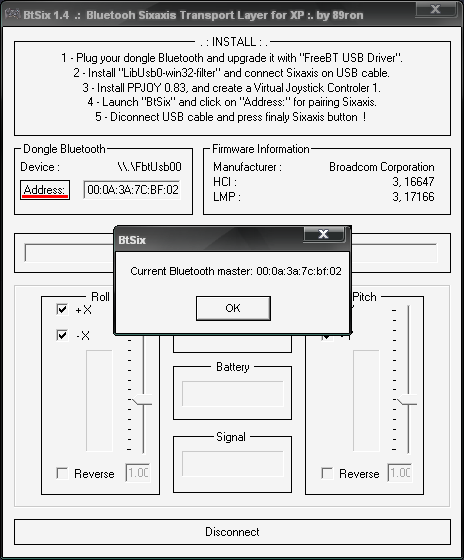
Open BtSix, then press the "Address" Button, to Dialogs should come up with Hex code Unplug your controller and press the home Button.
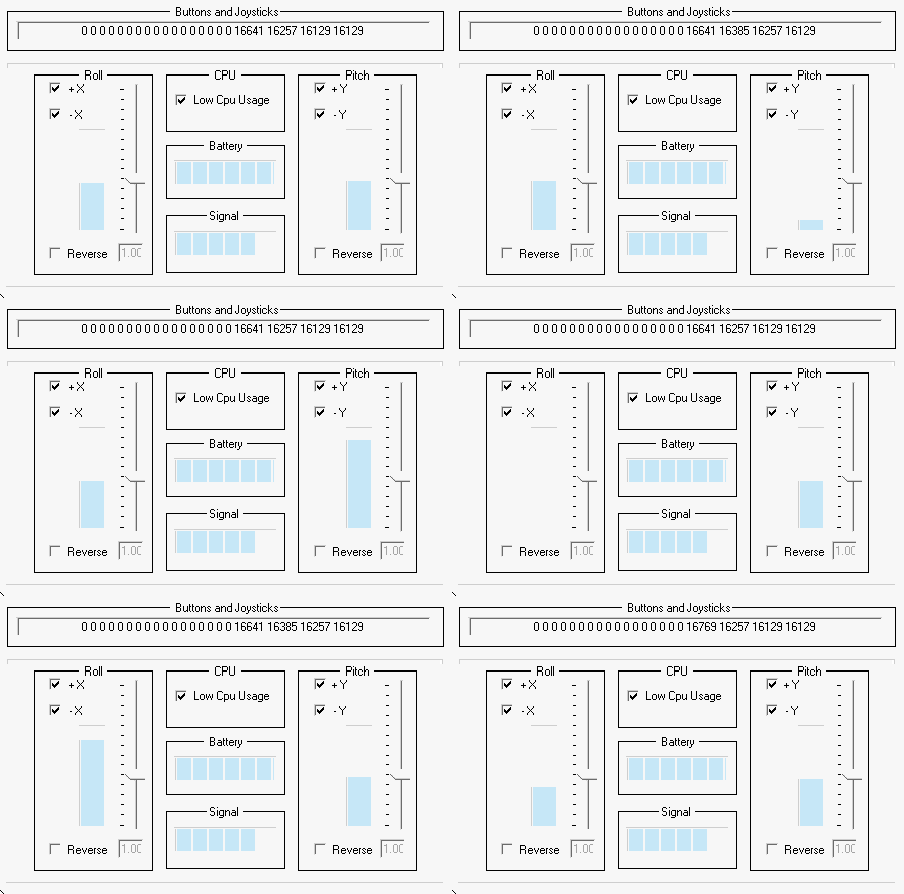
You should now see the "Pitch" and "Roll" Bars moving based on where you move your controller.
Configuring the Controller
And here comes the more complicated part, the Controller Configuration
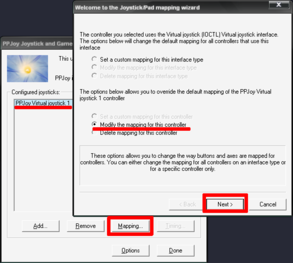
Open up PPjoy and select the controller you made earlier then press "Mapping..." select the "Modify the mapping for this controller" option and press next.
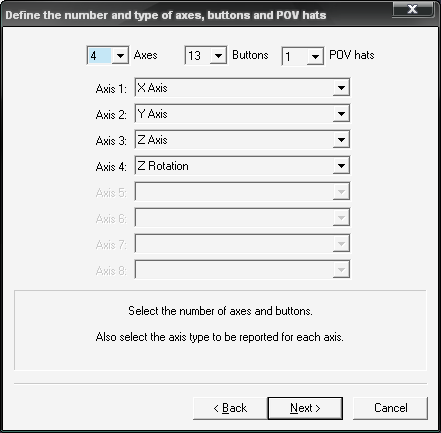
Pick 4 Axes, 13 Buttons, and 1 POV hat, I'd recommend naming the Axis 1-4 X Axis, Y Axis, Z Axis, and Z Rotation, respectively.
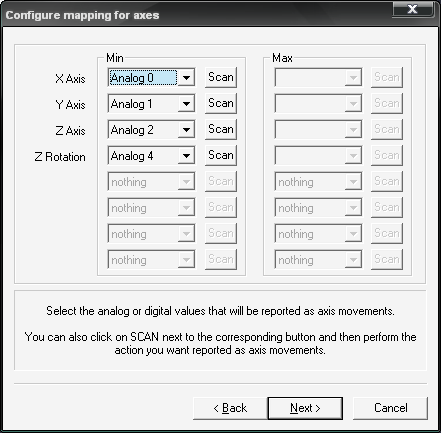
Then press next, Assign X,Y,Z, and Z rot to Analog 0,1,2, and 4 (I intentionally skipped 3) and press next.
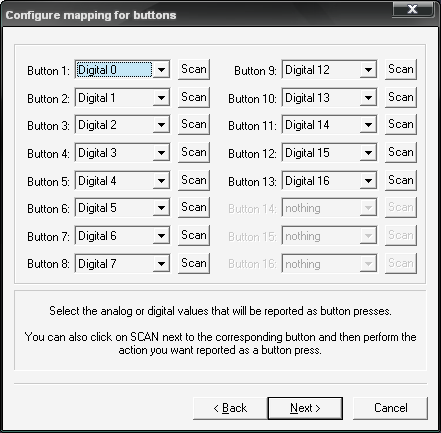
Assign buttons 1-8 to Digital 0-7, then assign Buttons 9-13 with Digital 12-16 and press next.
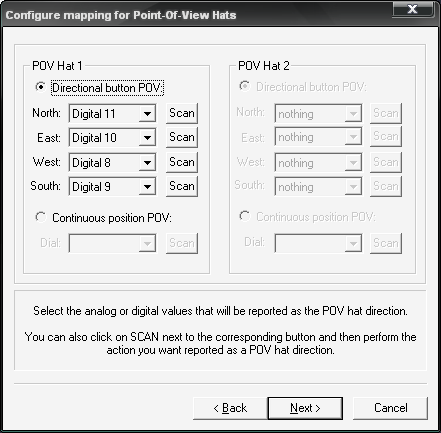
On this one assign North-Digital 11, East-Digital 10, West-Digital 8, South-Digital 9.
EDiT:
PPJoy in more Depth
Analog
0 - left stick x axis
1 - left stick y axis
2 - right stick x axis
3 - UNKNOWN
4 - right stick y axis
5 - tilt x axis (left negative, right positive)
6 - tilt y axis (forward negative, backword positive)
7 - square
8 - x
9 - circle
10- triangle
11- R1
12- L1
13- R2
14- L2
15- Dpad left
16- Dpad down
17- Dpad right
18- Dpad up
Digital
0 - square
1 - x
2 - cricle
3 - triangle
4 - R1
5 - L1
6 - R2
7 - L2
8 - Dpad left
9 - Dpad down
10- Dpad right
11- Dpad up
12- start
13- right stick button
14- left stick button
15- select
16- PS3 home button
Most of the PS3 buttons are Analog, however I haven't run across a Single PC game that properly uses it without help from an external program. So it's best to keep them digital unless your Using them for something PS2 specific[color=#c1c2c9]*Wink**Wink**Nudge**Nudge*[/color]
Adding Motion Control
If you want to add Motion control it is a Bit Difficult. Normal Key bindings with Rotation enabled are rather annoying, as any slight movement with the control cause it to register as the rotation. I don't use it or deal with it myself but here is how to add it. Open up PPJoy and Modify the controller, and Add 2 more Axes from the drop down Menu. Name them what ever you want (I Recommend X Rotation and Y Rotation as that is what they are) and press next. Assign One Analog 5 to one and Analog 6 to the other.
Using L2 and R2 as triggers
Simply Change Digital 6 and 7 to Analog 13 and 14 (If you are using the mapping a Gave you there are at Button 7 and 8).
An Alternate Method to this is to add two more Axis, then Apply Analog 13 and 14 to the two new Axis.
[color=green]Most of the Heavy Lifting was done by 89ron and a few other members at PS2Dev.org. I just ordered the information in a more understandable format.[/color]
|


